
Update your printer's driver
Much like any other computer application, printers require the latest available driver to work properly on Windows. If your printer came with a CD, it should have relevant software you can use to install drivers for your machine or check online for updates. You can also check your printer manufacturer's website if they have posted any driver updates that you can download. In some cases, you may be able to find an updated driver through Windows Update:

Click the Start button and go to "Settings."
Head to "Update & Security" and choose "Windows Update" from the left sidebar.
Choose "Check for updates."
If there is an updated printer driver available, Windows should be able to download and install it automatically. If it doesn't, here's what you can do:

Hit the Start button, open "Settings", then go to "Devices."
From the left sidebar, select "Printers & scanners."
Under "Related Settings," click "Print server properties."
Navigate to the "Drivers" tab and check if your printer is listed. If it is, then you already have the latest one installed.
If you don't see it on the list, click "Add" to launch the "Printer Driver Wizard."
Hit "Next," then select your device's architecture.
Hit "Next" again, then choose your printer manufacturer and the printer driver you want to install.
Click "Next" one last time, then "Finish" to begin installing the driver.
Follow the onscreen instructions to add the driver, then go through the steps for uninstalling and reinstalling your printer mentioned earlier.
A slow printer can quickly put the brakes on any important print job. Slow prints are usually caused by sluggish or out of date software or a spotty wireless connection. For a quick fix, make sure that all of your printer drivers and printer software is up to date. You can download the latest software update on your printer’s LCD display screen, or go to directly your printer’s support page to check for the most recent update. If you suspect the wifi is the issue, move your printer closer to the router to make a stronger connection. We also recommend checking the printer quality settings on your printer menu. Different quality settings use a different amount of ink, which can impact the print speed. A document printing on the “Best” setting is going to take much longer than “draft” mode, which uses less ink. As a general rule, the simpler the printer settings, the faster your printer will print.
If you are having trouble diagnosing your printer issue, printing a test page or printer status report can help narrow down what the problem is. If the test page prints successfully then your issue is likely the printer driver, printer software or cable connection. If it doesn’t print properly then there is likely an issue with the printer itself and may require repairs. How to Print a Test Page in Windows 10 To print a test page in Windows 10, go to Settings > Devices > Printers & Scanners. Then select your printer and select Manage>Print a Test Page. How to Print a Test Page in Windows 8 To print a test page in Windows 8, press the Windows key on your keyboard, then search “printer” on the start page. Select Settings > View Devices and Printers, then right click the printer icon and open up “Printer Properties” and select “Print Test Page” How to Print a Test Page in Windows 7 To print a test page in Windows 7, click the “Start” button > Control panel > Devices and Printers. Then right click the printer icon and open up “Printer Properties” and select “Print Test Page”

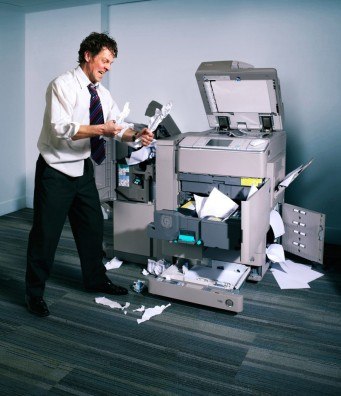
Paper Jams Happen As copiers have improved over the years, they've become victims of their own success. Many of our customers seem to expect that jams should never happen at all – regardless of how many torn documents or staples they send through the machine. Inside of the copier is an array of rollers and gears that move paper through the machine – if you leave a stapler (or paper clip or tape or a sticky note) on a document and then try to scan or copy that document, there's a good chance something bad will happen. Practice common sense paper handling: 1. Watch out for tears and dog-eared pages 2. Remove staples, paperclips, binder clips, etc. 3. Remove Post-It notes 4. Try to “batch” similar sized documents together for bulk scanning or copying (Dedicated scanners can often handle multiple document sizes and paper types in a single batch – stack – of documents. Copiers, not so much.)
Paper Jams Some of our service technicians think Bob Marley's “Jammin'” should be the theme song of copiers – EVERYONE has experienced a paper jam. There are many reasons for paper jams, a few of the most common, and quick fixes, are: Paper – You need to handle your paper properly: Humidity and old paper – paper sitting in the tray for long periods of time can absorb moisture from the air and become “sticky” (yes, even in Las Vegas). Remove old paper and fan the edges. If that doesn't work, replace the paper. Wrong paper size – use the right size for the print job at hand Wrong paper settings – adjust your copier settings when using different paper stocks Drawer alignment – be sure the drawer guides are tight against the edges of the paper Torn edges, dog-eared corners, and forgotten staples can all create jams. It's often faster to copy torn pages one at a time rather than trying through the paper feeder Right side up – ever noticed the arrow on a ream of paper? It's there for a reason. To load new paper: Find the arrow on the end of the ream of paper's packaging Add the paper to the copier with the top of the paper in the same direction as the arrow Worn rollers – these help move paper through the machine. As they wear, the paper can “slip” and cause jams. Call your copier repair partner – don't try to fix yourself!
Lines on Paper Nothing is worse than when you need to make copies of an important document, but it prints out with lines and other deformities. This can be caused by foreign substances on the glass or the mirrors within, or can be due to a drum blade malfunction. The first step is to clean the class. If the black line persists, make a copy, place the paper on the glass, and align the line – then look for any residue on the glass to remove by gently scraping with a fingernail and then wiping with a cloth. If that doesn't fix the problem, call for service because there's likely an issue within the device